Spring Boot 是由 Pivotal 团队提供的全新框架,其设计目的是用来简化新 Spring 应用的初始搭建以及开发过程。该框架使用了特定的方式来进行配置,从而使开发人员不再需要定义样板化的配置。 Spring Boot 其实不是什么新的框架,它默认配置了很多框架的使用方式,就像 Maven 整合了所有的 Jar 包,Spring Boot 整合了所有的框架。Spring Boot 以约定大于配置的核心思想,默认帮我们进行了很多设置,多数 Spring Boot 应用只需要很少的 Spring 配置。Spring Boot 开发了很多的应用集成包,支持绝大多数开源软件,让我们以很低的成本去集成其它主流开源软件。
1.启动器
pom.xml文件
默认指定了其父项目
<parent>
    <groupId>org.springframework.boot</groupId>
    <artifactId>spring-boot-starter-parent</artifactId>
    <version>2.6.3</version>
    <relativePath/> <!-- lookup parent from repository -->
</parent>
而其父项目又作为SpringBoot 依赖包的子项目,并且作了很多配置。所以以后我们导入的 Starter 默认不需要写版本。
<parent>
  <groupId>org.springframework.boot</groupId>
  <artifactId>spring-boot-dependencies</artifactId>
  <version>2.6.3</version>
</parent>
基础 Starter:
<!--web依赖:tomcat,dispatcherServlet,xml-->
<dependency>
    <groupId>org.springframework.boot</groupId>
    <artifactId>spring-boot-starter-web</artifactId>
</dependency>

<!--单元测试-->
<dependency>
    <groupId>org.springframework.boot</groupId>
    <artifactId>spring-boot-starter-test</artifactId>
    <scope>test</scope>
</dependency>
springboot-boot-starter-xxx:就是spring-boot的场景启动器
spring-boot-starter-web:帮我们导入了web模块正常运行所依赖的组件;
SpringBoot 将所有的功能场景都抽取出来,做成一个个的starter (启动器),只需要在项目中引入这些
starter即可,所有相关的依赖都会导入进来 , 我们要用什么功能就导入什么样的场景启动器即可 ;我
们也可以自己自定义 starter;
2.自动装配
@SpringBootApplication
	@SpringBootConfiguration	springboot的配置类
		@Configuration			  spring配置类
	@EnableAutoConfiguration		自动配置
		@AutoConfigurationPackage	 自动配置包
			@Import(AutoConfigurationPackages.Registrar.class) 自动配置包 注册者
		@Import(AutoConfigurationImportSelector.class)		自动配置文件收集器
			protected List<String> getCandidateConfigurations() {}	获取候选配置
		   		SpringFactoriesLoader.loadFactoryNames()
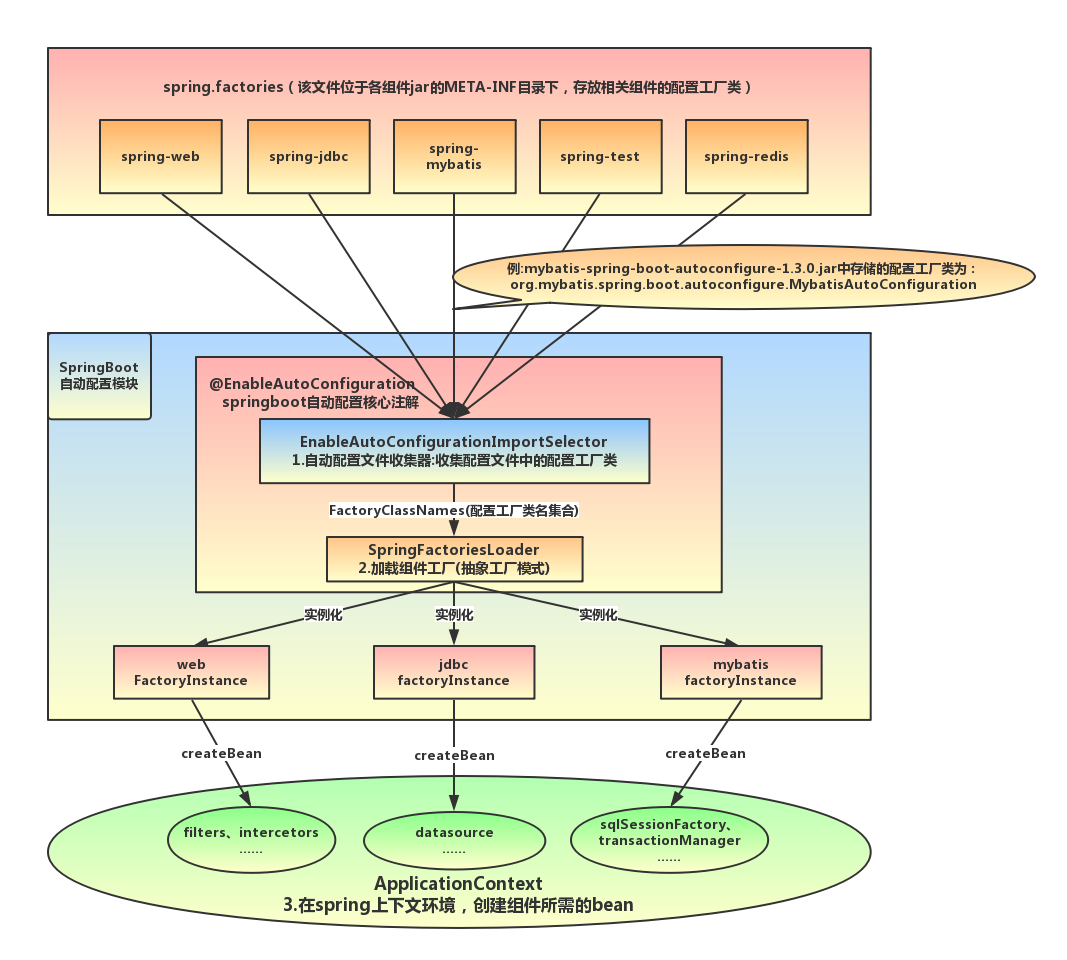
protected List<String> getCandidateConfigurations(AnnotationMetadata metadata, AnnotationAttributes attributes) {
    List<String> configurations = SpringFactoriesLoader.loadFactoryNames(getSpringFactoriesLoaderFactoryClass(),
                                                                         getBeanClassLoader());
    Assert.notEmpty(configurations, "No auto configuration classes found in META-INF/spring.factories. If you "
                    + "are using a custom packaging, make sure that file is correct.");
    return configurations;
}
方法中 getSpringFactoriesLoaderFactoryClass() 获取自动装配的 @EnableAutoConfiguration 注解类;
SpringFactoriesLoader.loadFactoryNames 加载自动配置类,得到所有自动装配类的候选项列表。
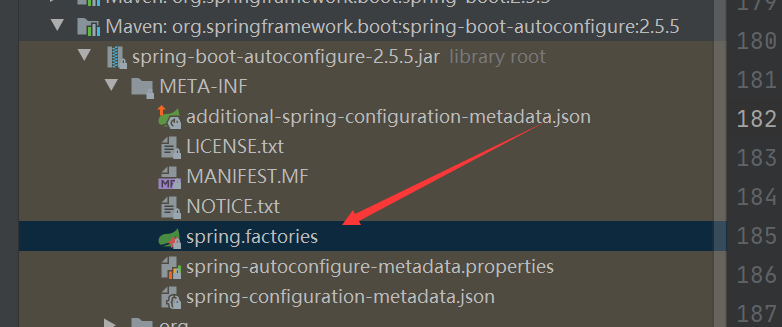
所有的spring配置类都在 META-INF/spring.factories 。
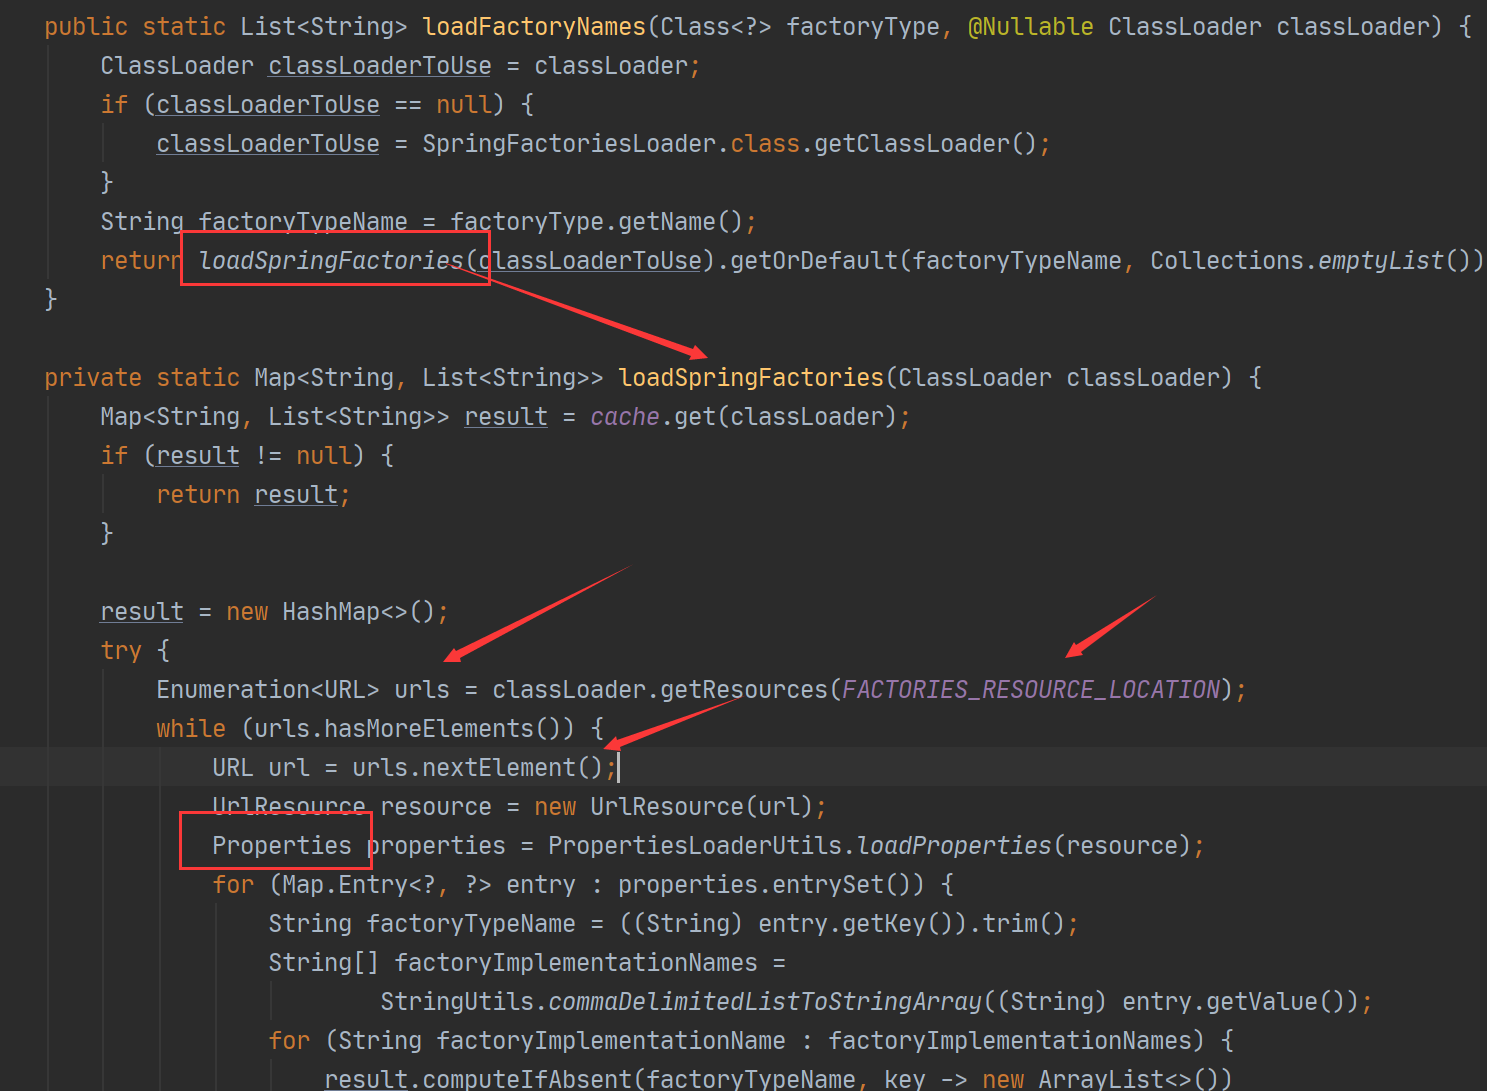
// 配置类的路径
public static final String FACTORIES_RESOURCE_LOCATION = "META-INF/spring.factories";
//放到一个配置类中
Properties properties = PropertiesLoaderUtils.loadProperties(resource);
@ConditionalOnxxx 注解 判断条件,可以看到这些一个个的都是 JavaConfig 配置类,而且都注入了一些Bean。
所以,自动配置真正实现是从classpath中搜寻所有的 META-INF/spring.factories 配置文件 ,并将其中
对应的 org.springframework.boot.autoconfigure. 包下的配置项,通过反射实例化为对应标注了
@Configuration的 JavaConfig 形式的 IOC容器配置类 , 然后将这些都汇总成为一个实例并加载到 IOC容
器中。
**结论:**springboot 所有自动配置都是在启动时扫描并加载 spring.factories 中所有的自动配置类,但要先判断条件是否成立(是否导入相应的 starter ),成立了自动装配才会生效,配置成功!
3.SpringApplication
构造:
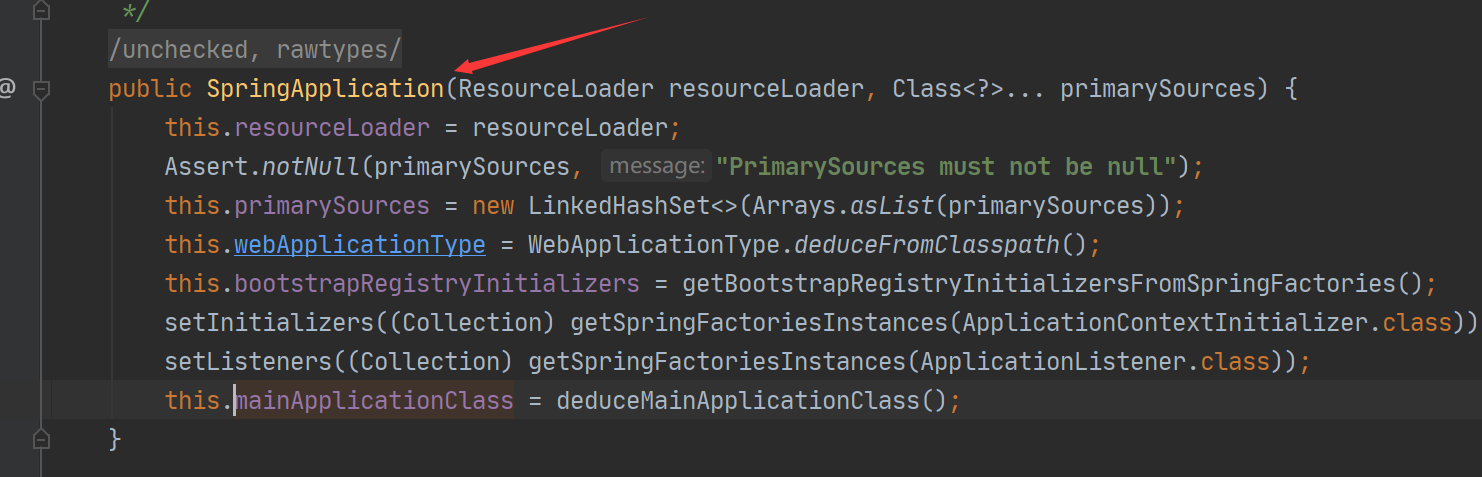
run方法:

这个类主要做了以下四件事情:
1、推断应用的类型是普通的项目还是Web项目
2、查找并加载所有可用初始化器 , 设置到 initializers属性中
3、找出所有的应用程序监听器,设置到 listeners属性中
4、推断并设置main方法的定义类,找到运行的主类
4.yaml
基本语法:
缩进严格,冒号后必须有一个空格
#普通的key-value
username: jiutian

#对象
student:
  name: jiutian
  age: 3

#行内写法
student2: {name: jiutian,age: 3}

#数组
pets:
  - cat
  - dog
  - pig

#行内写法
pets2: [cat,dog,pig]
application.yaml
person:
  name: jiutian${random.uuid}
  age: ${random.int}
  happy: false
  birth: 2000/07/07
  maps: {k1: v1,k2: v2}
  hello: 666
  lists:
    - code
    - music
    - gril
  dog:
    name: ${person.hello:hello}_旺财
    age: 3

dog:
  first-name: 阿黄
  age: 3
jiutian.properties
name=九天
使用注解 [ @PropertySource ] 加载指定配置文件需要springboot配置注解处理器,导入依赖
<!-- 导入配置文件处理器,配置文件进行绑定就会有提示,需要重启 -->
<dependency>
    <groupId>org.springframework.boot</groupId>
    <artifactId>spring-boot-configuration-processor</artifactId> 		                   <optional>true</optional>
</dependency>
Person类
@Component
@ConfigurationProperties(prefix = "person")
//加载指定的配置文件
//@PropertySource(value = "classpath:jiutian.properties")
public class Person {

    //SpEL表达式 取出配置文件的值
    //@Value("${name}")
    private String name;
    private Integer age;
    private Boolean happy;
    private Date birth;
    private Map<String,Object> maps;
    private List<Object> lists;
    private Dog dog;

    ...有参构造,无参构造,get/set,toString
}
Dog类
@Component
@ConfigurationProperties(prefix = "dog")
public class Dog {

    private String firstName;
    private Integer age;

    ...有参构造,无参构造,get/set,toString
}
**松散绑定:**firstName ---- first-name
结论:
@PropertySource **:**加载指定的配置文件;
@configurationProperties:默认从全局配置文件中获取值;
配置yml和配置properties都可以获取到值 , 强烈推荐 yml;
如果在某个业务中,只需要获取配置文件 [ xxx.properties ] 中的某个值,可以使用 @value;
如果专门编写了一个JavaBean来和配置文件 [ application.yaml ] 进行一一映射,就直接用
@configurationProperties。
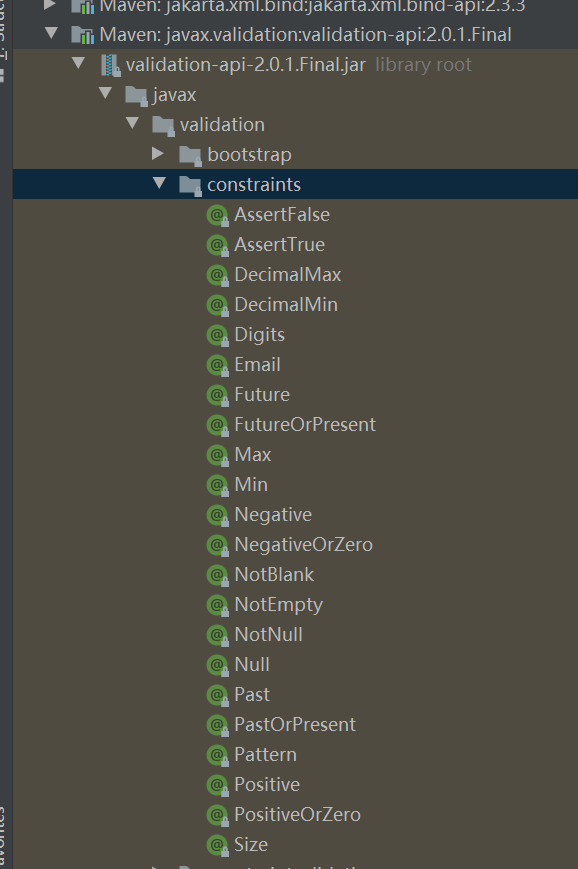
JSR303校验
@Validated      //数据校验
public class Person {

}
@NotNull(message="名字不能为空")
private String userName;
@Max(value=120,message="年龄最大不能查过120")
private int age;
@Email(message="邮箱格式错误")
private String email;


空检查
@Null	 	验证对象是否为null
@NotNull 	验证对象是否不为null, 无法查检长度为0的字符串
@NotBlank 	检查约束字符串是不是Null还有被Trim的长度是否大于0,只对字符串,且会去掉前后空格. @NotEmpty   检查约束元素是否为NULL或者是Empty.


Booelan检查
@AssertTrue	 	验证 Boolean 对象是否为 true
@AssertFalse	 验证 Boolean 对象是否为 false


长度检查
@Size(min=, max=)	 验证对象(Array,Collection,Map,String)长度是否在给定的范围之内
@Length(min=, max=)  string is between min and max included.


日期检查
@Past		验证 Date 和 Calendar 对象是否在当前时间之前
@Future 	验证 Date 和 Calendar 对象是否在当前时间之后
@Pattern 	验证 String 对象是否符合正则表达式的规则

.......等等
除此以外,我们还可以自定义一些数据校验规则
多环境配置:
profile是Spring对不同环境提供不同配置功能的支持,可以通过激活不同的环境版本,实现快速切换环境;
多配置文件
我们在主配置文件编写的时候,文件名可以是 application-.properties/yml , 用来指定多个环境
版本;
例如:application-test.properties 代表测试环境配置 application-dev.properties 代表开发环境配置
但是Springboot并不会直接启动这些配置文件,它 默认使用 application.properties 主配置文件;
我们需要通过一个配置来选择需要激活的环境:
#比如在配置文件中指定使用dev环境,我们可以通过设置不同的端口号进行测试;
#我们启动SpringBoot,就可以看到已经切换到dev下的配置了;
spring.profiles.active=dev
yml 多文档块
和properties配置文件中一样,但是使用yml去实现不需要创建多个配置文件,更加方便 !
server:
  port: 8081
spring:
  profiles:
    active: test

---
server:
  port: 8082
spring:
  config:
    activate:
      on-profile: dev
---
server:
  port: 8083
spring:
  config:
    activate:
      on-profile: test
注意:如果yml和properties同时都配置了端口,并且没有激活其他环境 , 默认会使用properties配置文件
5.深入自动装配
一句话总结 : 根据当前不同的条件判断,决定这个配置类是否生效!
一但这个配置类生效;这个配置类就会给容器中添加各种组件; 这些组件的属性是从对应的properties类中获取的,这些类里面的每一个属性又是和配置文件绑定的;
所有在配置文件中能配置的属性都是在xxxxProperties类中封装着;配置文件能配置什么就可以参照某个功能对应的这个属性类。
1、SpringBoot启动会加载大量的自动配置类 ;
2、我们看我们需要的功能有没有在SpringBoot默认写好的自动配置类当中;
3、我们再来看这个自动配置类中到底配置了哪些组件;(只要我们要用的组件存在在其中,我们就不需
要再手动配置了) ;
4、给容器中自动配置类添加组件的时候,会从properties类中获取某些属性。我们只需要在配置文件中
指定这些属性的值即可;
-
xxxxAutoConfigurartion:自动配置类;给容器中添加组件 。
-
xxxxProperties: 封装配置文件中相关属性的类 [ 注解@ConfigurationProperties(prefix = "spring.mvc") ] 。
-
每个自动配置类中封装了对应的xxxxProperties ,例如
public class WebMvcAutoConfiguration {

    @Configuration(proxyBeanMethods = false)
    @Import(EnableWebMvcConfiguration.class)
    @EnableConfigurationProperties({ WebMvcProperties.class,org.springframework.boot.autoconfigure.web.ResourceProperties.class, WebProperties.class })
    public static class WebMvcAutoConfigurationAdapter implements WebMvcConfigurer,ServletContextAware {

    }
}
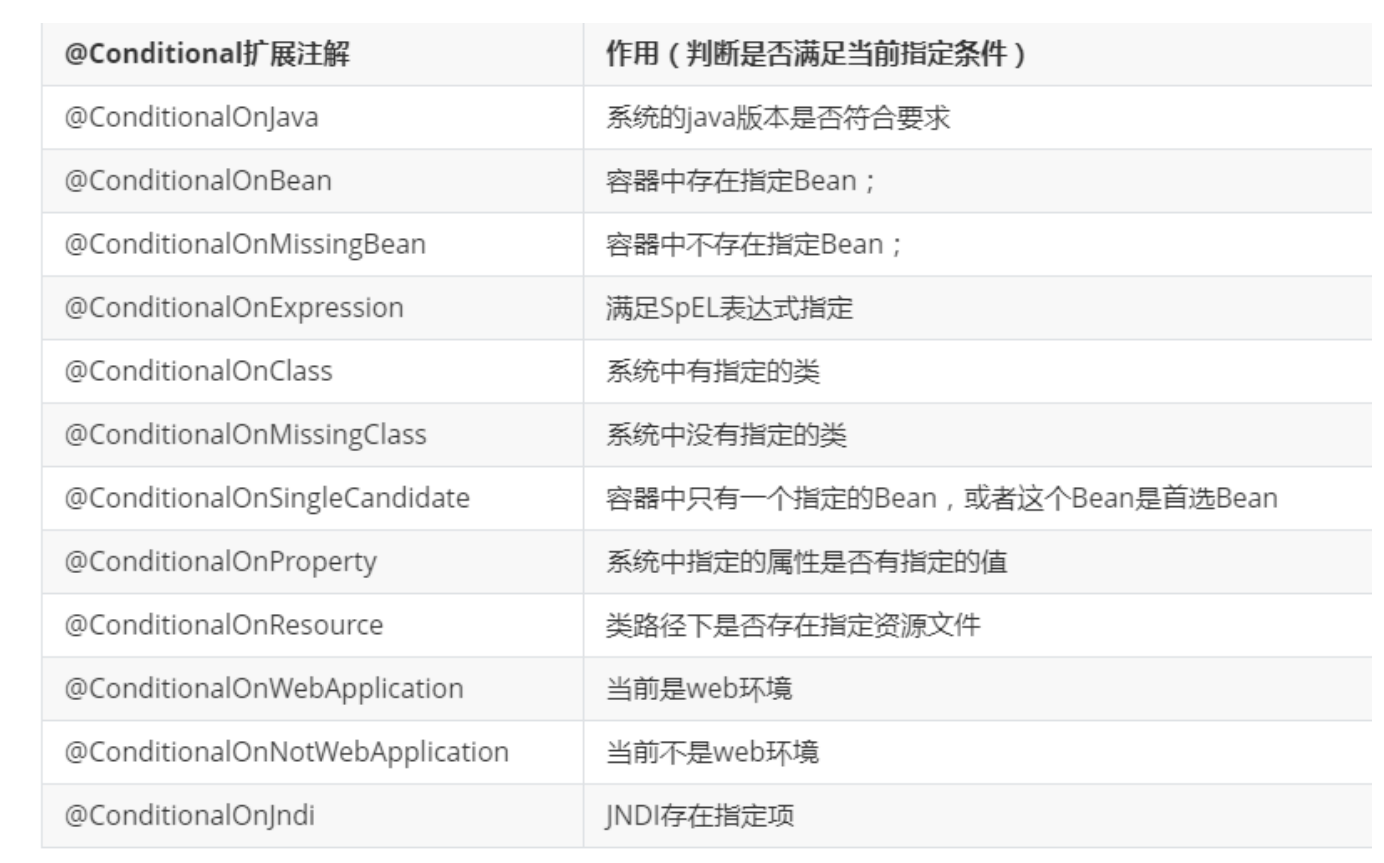
@Conditional
@Conditional 派生注解(具有Spring原生注解 @Conditional 的作用)
作用:必须是 @Conditional 指定的条件成立,才给容器中添加组件,配置类里面的所有内容才生效;
# 通过 debug=true 可查看哪些自动配置类生效,哪些没有生效!
debug: true
Positive matches: (自动配置类启用的:正匹配)
Negative matches: (没有启动,没有匹配成功的自动配置类:负匹配)
Unconditional classes: (没有条件的类)
6.静态资源
Webjars
Webjars本质就是以jar包的方式引入我们的静态资源 , 我们要导入一个静态资源文件,直接导入即
可。
比如导入jquery.js
<dependency>
    <groupId>org.webjars</groupId>
    <artifactId>jquery</artifactId>
    <version>3.4.1</version>
</dependency>
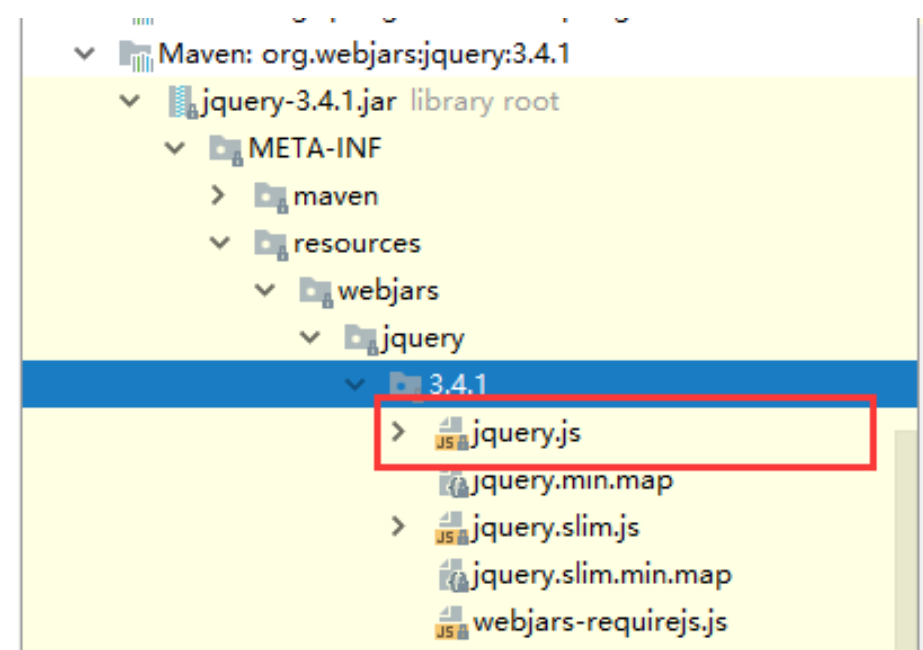
其访问路径则为:localhost:8080/webjars/jquery/3.4.1/jquery.js
默认的路径
// 进入ResourceProperties类的方法
public String[] getStaticLocations() {
	return super.getStaticLocations();
}

//跳到WebProperties的静态内部类Resources [ ResourceProperties类的父类]
// 找到对应的值
private String[] staticLocations = CLASSPATH_RESOURCE_LOCATIONS;
// 找到路径
private static final String[] CLASSPATH_RESOURCE_LOCATIONS = {
    "classpath:/META-INF/resources/",
    "classpath:/resources/",
    "classpath:/static/",
    "classpath:/public/"
};
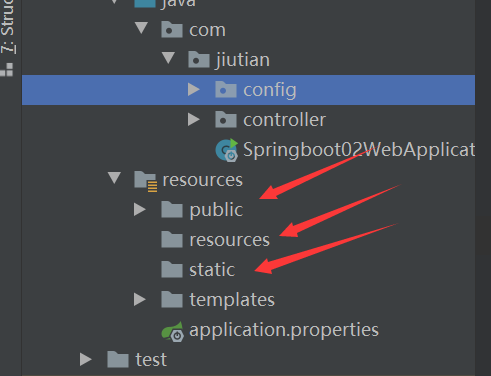
自定义静态资源路径
spring.resources.static-locations=classpath:/coding/,classpath:/jiutian/
一旦自己定义了静态文件夹的路径,原来的默认路径就都会失效了!
总结:
- webjars
localhost:8080/webjars - public ,static ,resources
localhost:8080/
优先级:resources > static(默认) > public
7.Thymeleaf
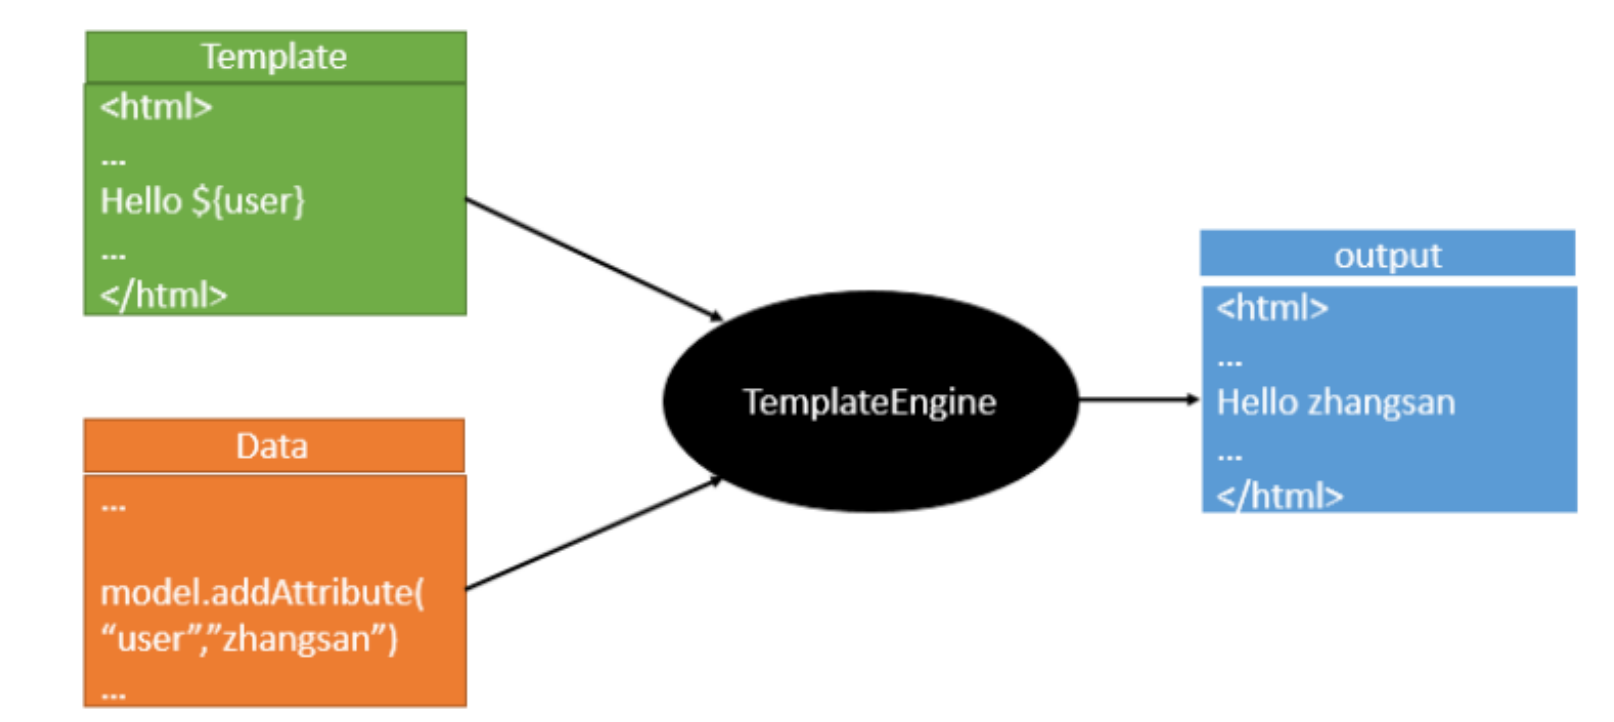
模板引擎的作用就是我们来写一个页面模板,比如有些值呢,是动态的,我们写一些表达式。而这些值,从哪来呢,就是我们在后台封装一些数据。然后把这个模板和这个数据交给我们模板引擎,模板引 擎按照我们这个数据帮你把这表达式解析、填充到我们指定的位置,然后把这个数据最终生成一个我们想要的内容给我们写出去,这就是模板引擎,不管是jsp还是其他模板引擎,都是这个思想。
导入依赖:
<dependency>
    <groupId>org.thymeleaf</groupId>
    <artifactId>thymeleaf-spring5</artifactId>
</dependency>
<dependency>
    <groupId>org.thymeleaf.extras</groupId>
    <artifactId>thymeleaf-extras-java8time</artifactId>
</dependency>
从源码中可以看到,路径是 classpath:/templates/,下的 *.html
public class ThymeleafProperties {

   private static final Charset DEFAULT_ENCODING = StandardCharsets.UTF_8;

   public static final String DEFAULT_PREFIX = "classpath:/templates/";

   public static final String DEFAULT_SUFFIX = ".html";

}
html需要加命名空间
xmlns:th="http://www.thymeleaf.org"
8.MVC自动配置原理
扩展功能
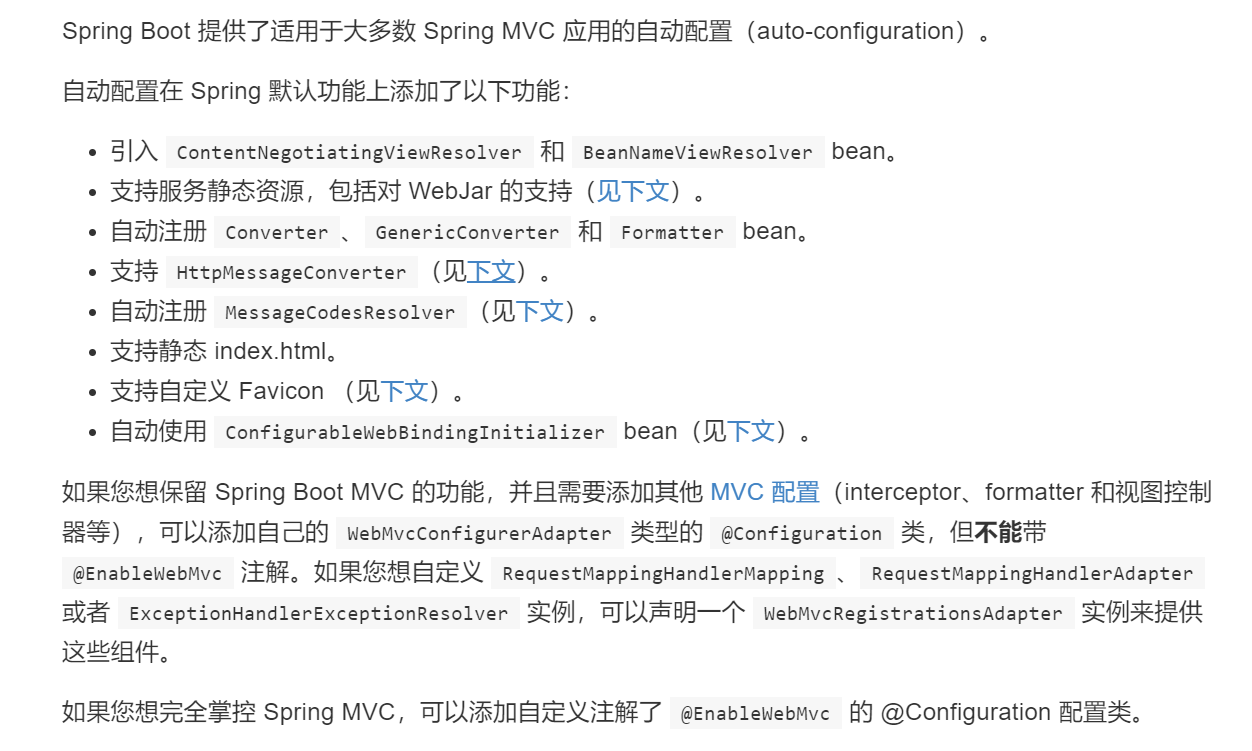
ContentNegotiatingViewResolver
public class ContentNegotiatingViewResolver extends WebApplicationObjectSupport
      implements ViewResolver, Ordered, InitializingBean {

    @Nullable
	private List<View> defaultViews;
	@Nullable
	private List<ViewResolver> viewResolvers;

	...

	//初始化Servlet上下文
	@Override
	protected void initServletContext(ServletContext servletContext) {
		//从beanFactory工具中获取容器中的所有视图解析器
		Collection<ViewResolver> matchingBeans = BeanFactoryUtils.beansOfTypeIncludingAncestors(
				obtainApplicationContext(),ViewResolver.class).values();
		if (this.viewResolvers == null) {
			this.viewResolvers = new ArrayList<>(matchingBeans.size());
			for (ViewResolver viewResolver : matchingBeans) {
				if (this != viewResolver) {
					this.viewResolvers.add(viewResolver);
				}
			}
		}
		...
	}

	//解析视图名字
	public View resolveViewName(String viewName, Locale locale) throws Exception {
		...
		if (requestedMediaTypes != null) {
			List<View> candidateViews = getCandidateViews(viewName, locale, requestedMediaTypes);
			View bestView = getBestView(candidateViews, requestedMediaTypes, attrs);
			if (bestView != null) {
				return bestView;
			}
		}
		...
	}

	//获取候选的视图
	private List<View> getCandidateViews(String viewName, Locale locale, List<MediaType> requestedMediaTypes) throws Exception {
		List<View> candidateViews = new ArrayList<>();
		if (this.viewResolvers != null) {
			for (ViewResolver viewResolver : this.viewResolvers) {
				View view = viewResolver.resolveViewName(viewName, locale);
				if (view != null) {
					candidateViews.add(view);
				}
				...
			}
		}
		...
	}

	//获得最好的视图
	private View getBestView(List<View> candidateViews, List<MediaType> requestedMediaTypes, RequestAttributes attrs) {
		for (View candidateView : candidateViews) {
			if (candidateView instanceof SmartView) {
				SmartView smartView = (SmartView) candidateView;
				if (smartView.isRedirectView()) {
					return candidateView;
				}
			}
		}
		...
	}
    ...
}
扩展使用SpringMVC
config/MyMvcConfig
//自定义一些定制化的功能,只需要自定义组件,将其交给springboot,它会自动装配
//扩展springmvc       dispatcherServlet
@Configuration
//@EnableWebMvc	 不能加
public class MyMvcConfig implements WebMvcConfigurer {

    //视图跳转
    @Override
    public void addViewControllers(ViewControllerRegistry registry) {
        registry.addViewController("/jiutian").setViewName("test");
    }

    //拦截器
    @Override
    public void addInterceptors(InterceptorRegistry registry) {

    }

    @Bean
    public ViewResolver MyMvcViewResolver(){
        return new MyMvcViewResolver();
    }

    //自定义视图解析器
    public static class MyMvcViewResolver implements ViewResolver{
        @Override
        public View resolveViewName(String viewName, Locale locale) throws Exception {
            return null;
        }
    }
}
全面接管springboot
EnableWebMvc
@Import({DelegatingWebMvcConfiguration.class})
public @interface EnableWebMvc {
}
DelegatingWebMvcConfiguration
public class DelegatingWebMvcConfiguration extends WebMvcConfigurationSupport {
    // ......
}
Webmvc自动配置类 WebMvcAutoConfiguration
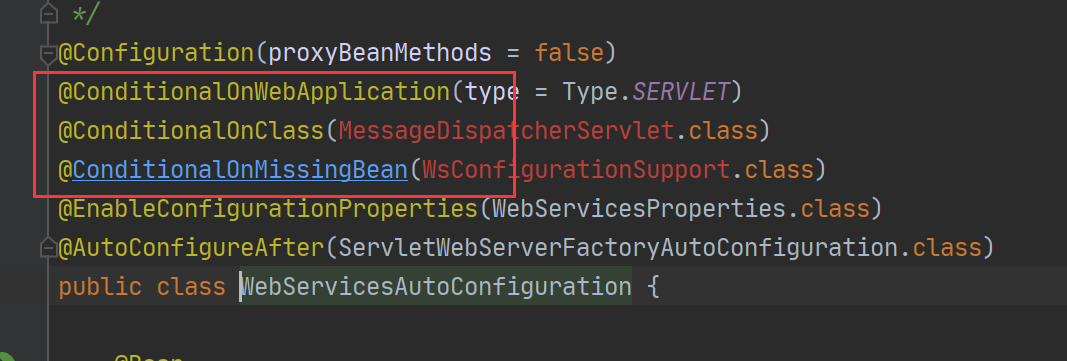
@Configuration(proxyBeanMethods = false)
@ConditionalOnWebApplication(type = Type.SERVLET)
@ConditionalOnClass({ Servlet.class, DispatcherServlet.class, WebMvcConfigurer.class })
// 这个注解的意思:容器中没有这个组件的时候,这个自动配置类才生效
@ConditionalOnMissingBean(WebMvcConfigurationSupport.class)
@AutoConfigureOrder(Ordered.HIGHEST_PRECEDENCE + 10)
@AutoConfigureAfter({ DispatcherServletAutoConfiguration.class, TaskExecutionAutoConfiguration.class,ValidationAutoConfiguration.class })
public class WebMvcAutoConfiguration {

}
总结一句话:@EnableWebMvc将WebMvcConfigurationSupport组件导入进来了;
而导入的WebMvcConfigurationSupport只是SpringMVC最基本的功能!
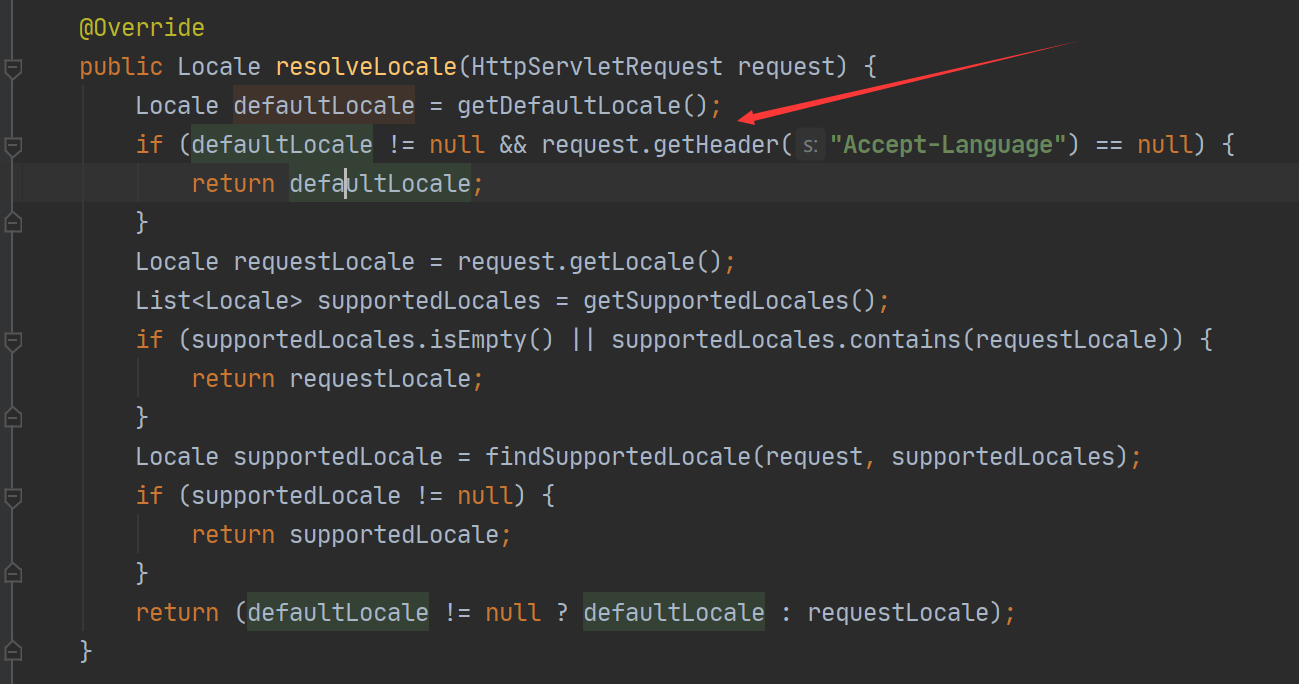
9.国际化
看源码
WebMvcAutoConfiguration
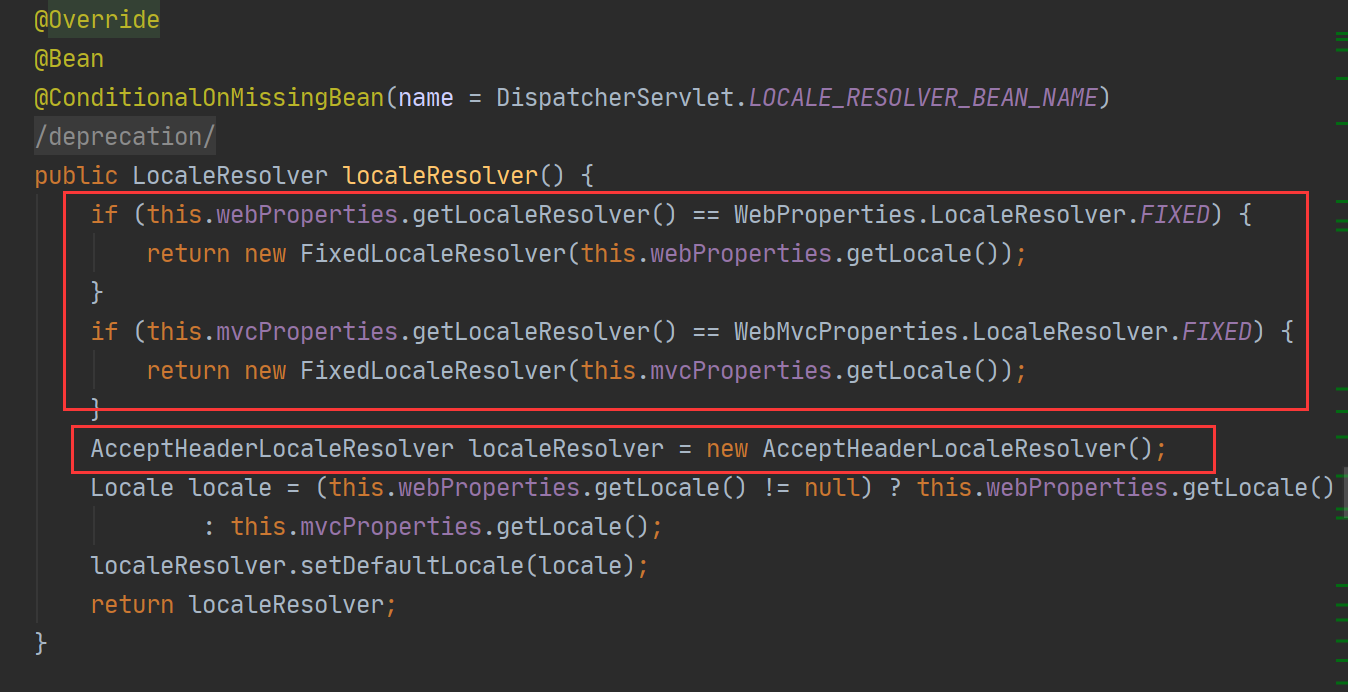
AcceptHeaderLocaleResolver
自己写一个
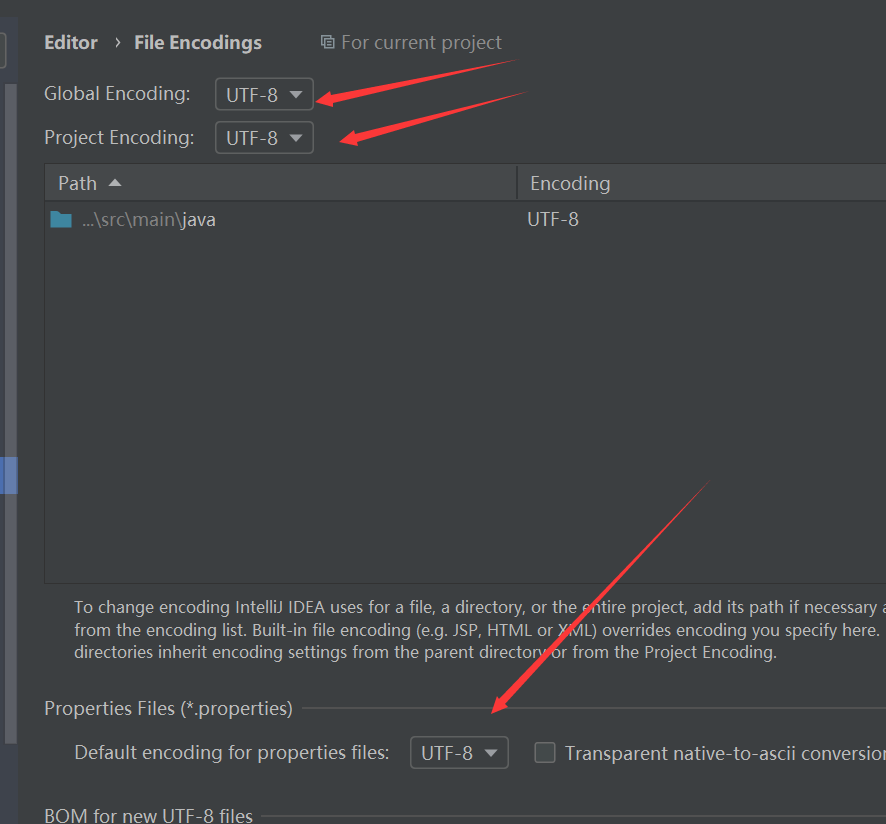
首先把编码全部设置为 UTF-8
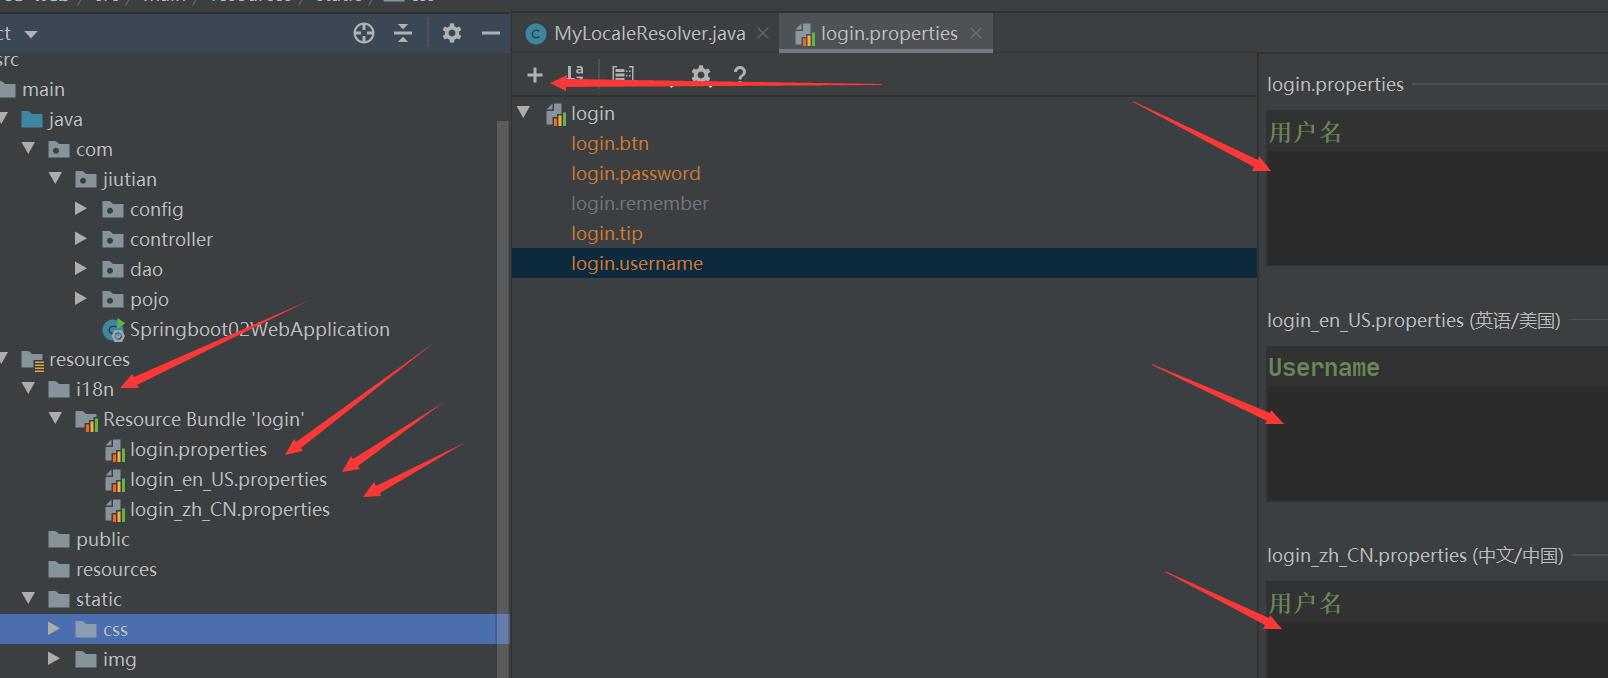
然后在 resources 目录下建 i18n 目录,存放国际化配置文件,在 i18n 下建立一个 login.properties 文件,还有一个 login_zh_CN.properties ,然后idea就会自动识别,生成父目录 ,然后右键父目录,New -> Add Locales to Resources Bundle login , 输入 en_US 即可增加一个配置英文的配置文件。
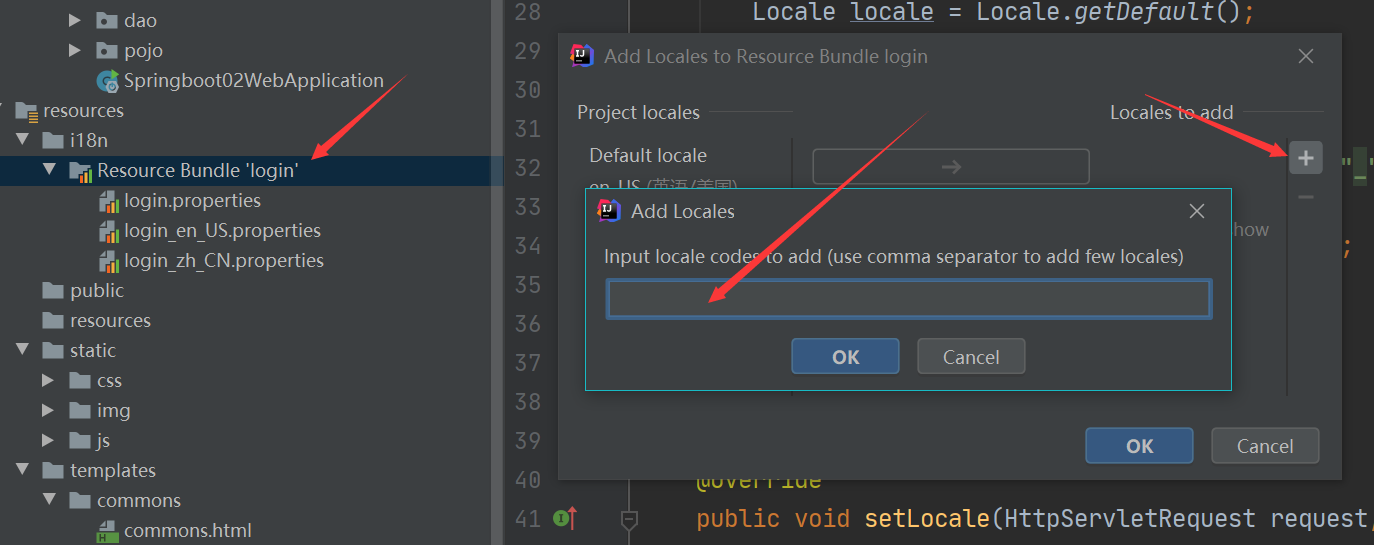
选中,点击下面的 Resources Bundle 即可切换视图,添加属性。
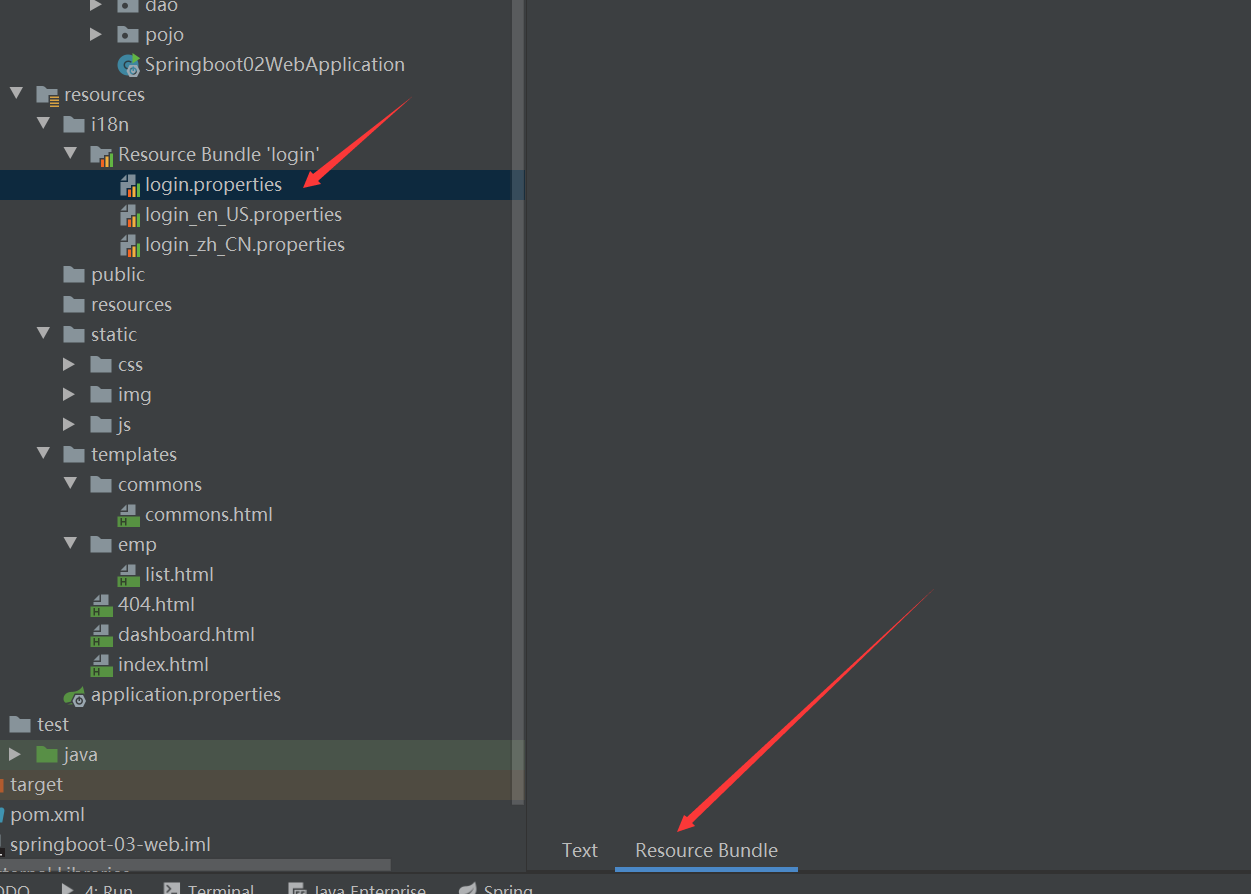
点击加号,输入名字,添加成功后,可在右边三个框框进行同时修改。
login_properties 默认
login_en_US_properties 英文
login_zh_CN_properties 中文
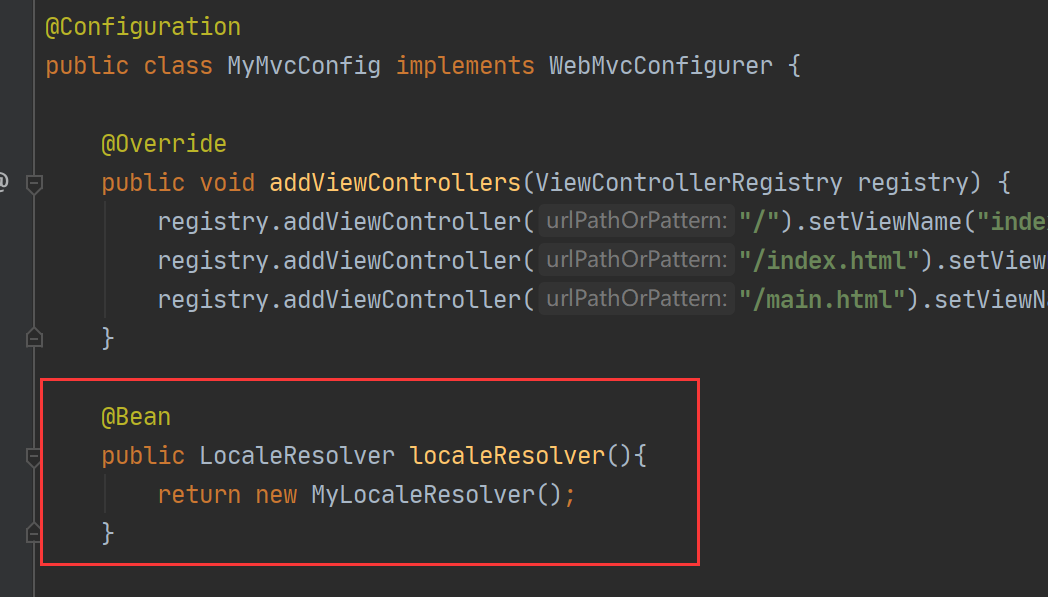
然后可仿照源码自定义一个 LocaleResolver
//自定义 地区解析器
public class MyLocaleResolver implements LocaleResolver {

    //国际化
    @Override
    public Locale resolveLocale(HttpServletRequest request) {

        //获取请求中的语言参数
        String language = request.getParameter("l");

        Locale locale = Locale.getDefault();

        if(!StringUtils.isEmpty(language)){
            //zh_CN
            String[] split = language.split("_");
            //语言,国家
           locale = new Locale(split[0], split[1]);
        }

        return locale;
    }

    @Override
    public void setLocale(HttpServletRequest request, HttpServletResponse response, Locale locale) {

    }
}
并且在 MyMvcConfig 配置类中注入 响应的 Bean
最后在html页面的 a 标签内 传参数 ,通过 () 进行传参
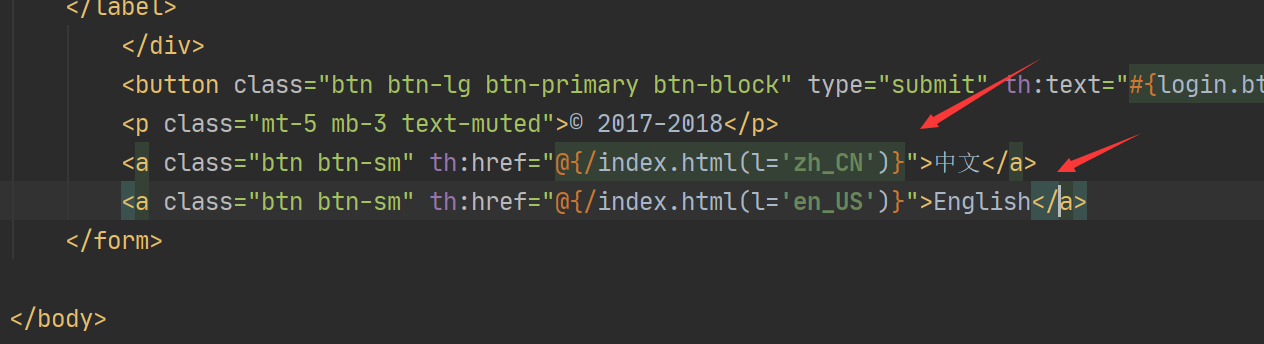
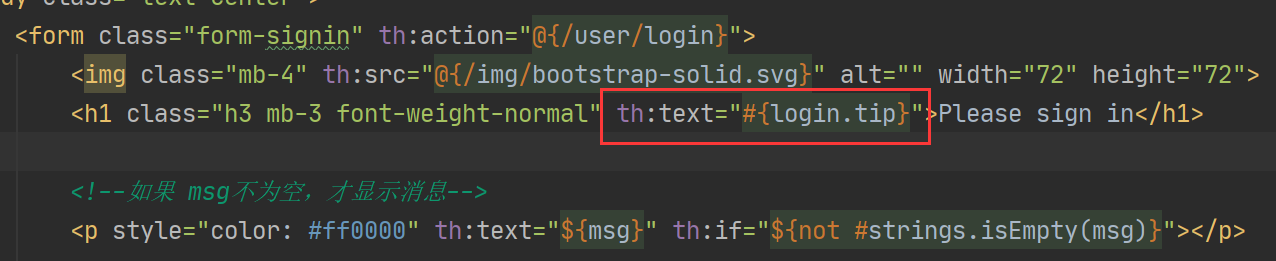
在需要切换的地方 用 #{} 引用即可
10.登录及拦截
登录拦截器
public class LoginHandlerInterceptor implements HandlerInterceptor {

    @Override
    public boolean preHandle(HttpServletRequest request, HttpServletResponse response, Object handler) throws Exception {

        Object loginUser = request.getSession().getAttribute("loginUser");
        if(loginUser == null){
            request.setAttribute("msg","没有权限,请先登录!");
            request.getRequestDispatcher("/index.html").forward(request,response);
            return false;
        }
        return true;
    }

}
在MyMvcConfig中配置
@Configuration
public class MyMvcConfig implements WebMvcConfigurer {

    @Override
    public void addViewControllers(ViewControllerRegistry registry) {
        // / 或 /index.html ->  index (index.html)
        registry.addViewController("/").setViewName("index");
        registry.addViewController("/index.html").setViewName("index");
        registry.addViewController("/main.html").setViewName("dashboard");
    }

    @Bean
    public LocaleResolver localeResolver(){
        return new MyLocaleResolver();
    }

    //addPathPatterns 拦截, excludePathPatterns 不拦截
    @Override
    public void addInterceptors(InterceptorRegistry registry) {
        registry.addInterceptor(new LoginHandlerInterceptor())
                .addPathPatterns("/**")
                .excludePathPatterns("/index.html","/","/user/login","/css/*","/js/*","/img/*");
    }
}